OpenFin windows
Windows created using the OpenFin Platform API act as a host (or container) for OpenFin Views. If your content is rendered in Views, your window can be used to display UI controllers, and acts as a "frame" within which views are drawn.
OpenFin standard window customization
The OpenFin Platform API includes OpenFin’s standard window, which has typical window controls (close, minimize, maximize) and some style customization.
As the name suggests, the standard window is used as the default window you get if you don’t specify the window’s URL upon creation.

You can easily apply your own stylesheet to the standard window by specifying the stylesheetUrl property within defaultWindowOptions in your manifest. The path or URL must be absolute, not relative.
Example of setting stylesheetUrl:
{
  "platform": {
    "uuid": "example_platform",
    "defaultWindowOptions": {
      "stylesheetUrl": "full-url-to-css-stylesheet"
    }
  },
  "snapshot": {
    ...
  }
}
Overriding standard frame CSS selectors
To get an idea of the selectors that are available for you to override, take a look at the Platform style examples or inspect the window using Chrome Developer Tools.
Modal windows
You can create windows that are modal relative to a parent window. This enables you to create the same effect as modal dialog boxes in native applications. To create a modal window, add modalParentIdentity to the window options when you create it. It's also important, for usability, to set autoShow to true; otherwise, it could be hidden but still blocking interaction with its parent window.
Example in JavaScript of creating a modal window:
let winOption = {
    name:'child',
    defaultWidth: 300,
    defaultHeight: 300,
    url: 'https://cdn.openfin.co/docs/javascript/stable/tutorial-Window.create.html',
    frame: true,
    autoShow: true,
    modalParentIdentity: {uuid: "OpenfinPOC", name: "OpenfinPOC"}
  };
fin.Window.create(winOption);
Complete window customization
You can also overwrite OpenFin's standard window and "bring your own window." To do so, specify the url property as a window option in your manifest. This HTML file must contain a div component where you want the layout to be rendered. Use this div as the containerId property when you call Layout.init to initialize the Layout in the window and load the views. A url can also be specified in windowOptions in a snapshot, or when launching a snapshot via other methods. The URL must be absolute, not relative.
Example of overriding the window with url:
{
  "platform": {
    "uuid": "example_platform",
    "defaultWindowOptions": {
      "url": "full-url-to-html-file"
    }
  },
  "snapshot": {
    ...
  }
}
The Layout.init() method must be called in the custom window to initialize the layout and load the views. Call init() on the DOMContentLoaded event or after the window is set up and the target <div> element has been created.
window.addEventListener('DOMContentLoaded', () => {
  fin.Platform.Layout.init({containerId: 'id-of-div'});
});
Note
The
defaultWindowOptions.stylesheetUrlproperty is supported only for overriding standard window styles. If you are providing a custom window, include your stylesheets in your custom HTML document.
Popup windows
OpenFin V26 introduces a new API to make creating and managing Popup windows easier for developers. Popup windows are independent windows which are not restricted to the bounds of the DOM of the calling window. This allows content to be displayed on top of views. Some use cases for popup windows are dialog boxes, floating help windows, and tooltips.
Popup windows also close when the launching view or window closes.
Example in JavaScript of a simple popup window:
const result = await fin.me.showPopupWindow({
  url: 'https://app_popup_url_here',  // The URL of your app's popup window.
  x: 150,                             // The x location for the upper left corner of your popup window.
  y: 100,                             // The y location for the upper left corner of your popup window.
  height: 150,                        // The popup window height.
  width: 300                          // The popup window width.
});
Popup windows can be placed programmatically so that you can place the window in a logical location, such as near the button the user clicked to launch the popup window.
Example in JavaScript of programmatic placement of the popup window:
const parentWindow = await (fin.me as OpenFin.View).getCurrentWindow();
const { identity: modalParentIdentity } = parentWindow;
const parentBounds = await parentWindow.getBounds();
const result = await fin.me.showPopupWindow({
  url: location.href.replace('app', 'popup'),
  x: Math.floor(parentBounds.width / 8),  // Location and size of popup window derived from parent window bounds.
  y: Math.floor(parentBounds.height / 8) - PARENT_FRAME_OFFSET,
  height: Math.floor(parentBounds.height - parentBounds.height / 4),
  width: Math.floor(parentBounds.width - parentBounds.width / 4),
});
Popup windows can return one or many results. By default when showPopupWindow is called it will wait for the popup to be dismissed or call dispatchPopupResult. If an onPopupResult callback is passed to showPopupWindow, the popup can dispatch many results to the caller and showPopupWindow will wait for the popup window to be dismissed.
Example in JavaScript of creating a popup window that sends multiple results:
const { right, height } = event.target.getBoundingClientRect();
const result = await fin.me.showPopupWindow({
  initialOptions: {
    customData: await fin.me.interop.getContextGroups()
  },
  url: location.href.replace('app', 'popup'),
  x: right + 5,
  y: Math.round((height / 2) + 15),
  height: 30,
  width: 250,
  resultDispatchBehavior: 'none',
  onPopupResult: (result) => {
    renderPopupResult(result);
  }
});
renderPopupResult(result);
Just as normal windows can be modal, popup windows can be modal windows as well. Just add modalParentIdentity in the initialOptions of the popup window.
Example in JavaScript of another way to add modalParentIdentity to the initial window options:
const result = await fin.me.showPopupWindow({
  initialOptions: {
    modalParentIdentity
  },
  url: 'https://app_popup_url_here',  // The URL of your app's popup window.
  x: 150,                             // The x location for the upper left corner of your popup window.
  y: 100,                             // The y location for the upper left corner of your popup window.
  height: 150,                        // The popup window height.
  width: 300                          // The popup window width.
  blurBehavior: 'modal'
});
Context menus
From OpenFin v12, context menus have been configured with the contextMenuSettings property of the Window and View options. Beginning in v27, OpenFin context menus can instead be configured with the contextMenuOptions property, which provides an easier to use and more versatile method of creating context menus via an API that closely matches the shape of both the Electron Menu API, and the OpenFin PopupMenu API. Additionally, three new context menu features are available via the new API: navigateForward, navigateBack, and reload. For backward compatibility, contextMenuSettings remains the default method to create context menus, but will likely be deprecated in a future release.
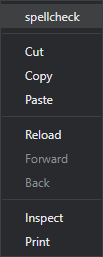
The spellCheck item is the only item that requires a bit of extra work to make it work in a context menu. To make the spell check option appear, a "spellCheck": true must be added to the defaultViewOptions or defaultWindowOptions property, and "spellcheck" must be included in the contextMenuOptions.template array. Both steps are required for proper functionality.
To leverage the new context menu features, add a contextMenuOptions property to your window or view options. The optional enabled property toggles the visibility of the entire context menu (defaults to true), while the optional template property is an array of one or more items from the list of available context menu items (defaults to a close approximation of v26 behavior, minus support for emoji, Copy link to highlight, and Print as plaintext). These options can be placed in any order, and can be repeated more than once in the list (a feature which is particularly useful for the separator item).
"defaultViewOptions": {
  "spellCheck": true,
  "contextMenuOptions": {
    "template": ["spellCheck", "separator", "cut", "copy", "paste", "separator", "reload", "navigateForward", "navigateBack", "separator", "inspect", "print"]
  }
}
Using the above defaultViewOptions, a right-click would show a context menu that looks like this:
The template has a fixed list of options that can be added to a context menu:
| Context menu item | Description |
|---|---|
navigateForward | Navigate forward to the next page of content. |
navigateBack | Navigate back to the previous page of content. |
print | Print the selected view or window. |
separator | A separator between menu items. |
cut | Cut the selected content and place it on the clipboard. |
copy | Copy the selected content and place it on the clipboard. |
paste | Paste the content on the clipboard to the selected view or window. |
undo | Undo the last action. |
redo | Redo the last undone action. |
selectAll | Select all in the right-clicked control. |
spellCheck | Invokes a spell check on the text of the selected view or window. |
inspect | Loads the Entity Viewer to view the entity that was right-clicked. |
reload | Reloads the view or window. |
Print views and windows
Starting in version 31, OpenFin Runtime expanded printing functionality to allow you to print all views in a window, with or without the window content, and to print screenshots.
Changes to printing options
A new printing options object has been added, WindowPrintOptions. WindowPrintOptions is a TypeScript discriminated union which means WindowPrintOptions can resolve to a PrintOptions object, a ScreenshotPrintOptions object, or a WindowViewsPrintOptions object depending on the value of the content element.
This is true in both JavaScript and TypeScript.
Here is how the value of content resolves the WindowPrintOptions object:
The value of content | WindowPrintOptions resolves to |
|---|---|
'screenshot' | ScreenshotPrintOptions |
'views' | WindowViewsPrintOptions |
undefined or 'self' | PrintOptions |
Additionally, when content is set to 'views', a new element, includeSelf, becomes available. The includeSelf boolean declares whether window content will or will not be printed when printing views.
Print a screenshot
// Print a screenshot of the current window.
win.print({ content: 'screenshot' });
When content is set to 'screenshot', a screenshot will be captured and sent to the printer.
The settings in the PrintOptions object will not be used for this print.
Print all views including window content
// Print all views of a window including all window content.
win.print({ content: 'views', includeSelf: true });
When content is set to 'views' and includeSelf is true, all views in the current window, and the window contents, will be sent to the printer.
The settings in the PrintOptions object will not be used for this print.
Print all views excluding window content
// Print all views of a window without printing the window content.
win.print({ content: 'views', includeSelf: false });
When content is set to 'views' and includeSelf is false, all views in the current window, without the window contents, will be sent to the printer.
The settings in the PrintOptions object will not be used for this print.
Legacy behavior
// Print using V30 functionality.
win.print({content: 'self'});
When content is undefined or set to 'self', the win.print function will work as it did in version 30 and earlier.
The settings in the PrintOptions object will be used for this print.
Window-closing behavior
When the user tries to close an app with unsaved changes, or navigate away from a form that hasn't been submitted, you can launch a warn-before-close dialog window. A warn-before-close dialog window is completely controlled by you as the platform provider and is exposed as an override that can be customized.
To intercept the close of a window or view:
- Set
"enableBeforeUnload": trueunder the Platform options in the app manifest. - Override the
getUserDecisionForBeforeUnloadfunction as in the example below.
Example in JavaScript of how to use a warn-before-close dialog:
const overrideCallback = async (PlatformProvider) => {
  class MyOverride extends PlatformProvider {

    // By overriding this function we can intercept the close action
    // of any Window or View and show our own custom dialog.
    async getUserDecisionForBeforeUnload(payload) {

      // We gather all relevant information from the payload:
      // Which views are preventing the unload and which aren't.
      // Also, if this a Window or View close.
      const { windowClose,
              viewsPreventingUnload,
              viewsNotPreventingUnload,
              windowId,
              closeType } = payload;

      // Launch a dialog that displays the relevant information to the user.
      const continueWithClose = await launchDialog(viewsPreventingUnload, windowId, closeType);

      if (continueWithClose) {

        // If the user decides to close the view, we send back an array of Views to close,
        // and whether the Window should close or not close.
        return { windowShouldClose: windowClose,
                 viewsToClose: [...viewsNotPreventingUnload, ...viewsPreventingUnload] };
      } else {

        // If the user cancels the close, we send an empty array of Views to close,
        // and indicate that the Window should not close.
        return { windowShouldClose: false, viewsToClose: [] };
      }
    }
  }
  return new MyOverride();
};

// Include the overrideCallback in the platform initialization call
fin.Platform.init({ overrideCallback });
See also
- Code samples for the different types of OpenFin windows can be found at Open different types of windows in the OpenFin Container-Starter repo.
- Code samples for window options can be found at Demonstrate the different options available for showing windows in the OpenFin Container-Starter repo.
- Code samples for popup windows can be found at How To Use Popup Window in the OpenFin Container-Starter repo.
Updated 11 months ago